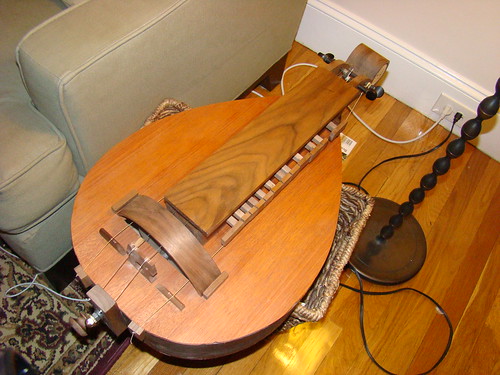
...I've spent the past week or two endlessly tinkering with the hurdy gurdy. I further filed down some of the keys, I've worked on tuning it (sometimes having to use filler to make the pegs fit tighter), experimented with rosin on the wheel and cotton on the strings, etc. I still need to work on the bridge some more, as right now the strings sit in very deep grooves. I think I'm just going to cut the surface of the bridge almost flat, so I can pull the melody strings off and on the wheel more easily.
I thought I'd do a wrap-up post, to review what I've learned, what I like, and what I dislike about this kit and the process. Here goes.
What I've learned:
- The right tool makes the job easier. I had to fudge a few times -- like using a lino cutter to trim the top instead of a good router, or using a circular saw when a coping or table saw would have done better. I had to improvise a bit, which was good, but it taught me the limitations of substitute tools.
- Measure twice, cut once. I knew this already, but it never hurts to brush up on the fundamentals. I'm not great at making straight cuts with a jig saw. Speaking of:
- Jig saws are terrifying. I don't know why I fear them, but I do. A new blade, however, makes a big difference.
- Wood putty does not varnish well. I used some filler on a few spots, thinking it would take to varnish, but it doesn't. You can stain it, but not varnish. Oh well -- one more component of my instrument's folksy appearance.
- Go slow. This was one of the first kit projects where I actually took my time and sweated the small stuff, and I think it paid off.
- Hand sanding is almost always better than machine sanding.
What I like about the Musicmaker's Hurdy Gurdy Kit:
- It really did have everything you needed to build the instrument. I didn't have to run out and find peg soap, weird gage strings, or anything. It was all there and did not assume I lived next to a fiddle shop.
- The wood is quality, and looks great.
- The resultant instrument, in the hands of a not-so-master-craftsman, is still playable and functional.
- The staff there were fantastic. When I noticed I was missing a part, they had it in the mail within a day. Brilliant.
- The kit was accurately described on their website, and the difficulty rating was accurate. It said there would be "character building" moments, and dammit, there were!
What I didn't like about the Musicmaker's Hurdy Gurdy Kit:
- The directions were usually clear and concise, but occasionally they lapsed or suffered from bad layout. For instance, at one point they tell you to drill the tail block as shown, but don't give you any measurements. So I eyeballed it. Turns out the measurements were somewhere else in the manual...fortunately I eyeballed it well.
- I really wish I didn't have to cut the brass for the handle-crank myself. I think they could have machined that for me...it was neither pleasant nor fun to do it myself with a jigsaw with a metal cutting blade, and the outcome wasn't great.
- The pegbox lid was a bit big...by the end of the process, I was too tired to cut it down. Again -- folksy! Small annoyance, yes.
- The final piece didn't quite line up with the measurements specified in the manual, despite every effort on my part. The most noticeable outcome of this was that I had to cut huge grooves in the bridge (probably a quarter-inch if not more) to get the strings to hit the wheel. As mentioned, I'm gonna hack down the bridge a bit more soon.
Don't get me wrong, though. The positives far outweighed the negatives here.
The most challenging parts of the process for me were (and please note that these challenges are more reflective of my ability, and not the quality and clarity of the kit):
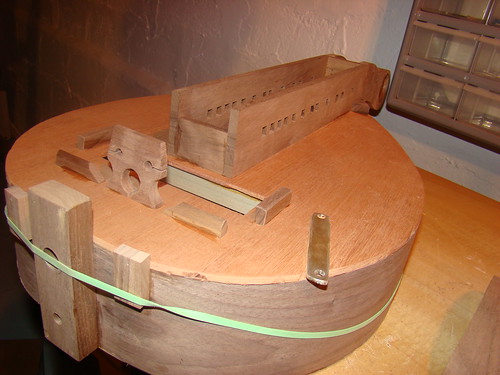
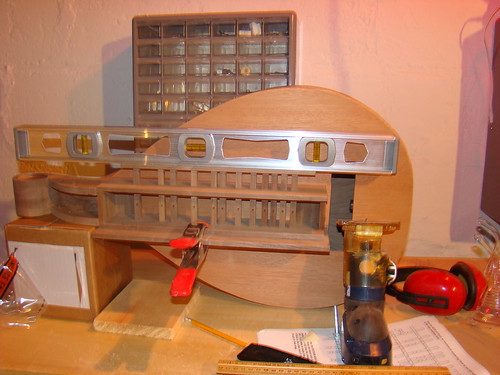
- Cutting the wheel-hole. My old jig saw blade was likely most of the problem, but it was tricky to cut a perfectly square/straight rectangle. Folksy!
- Getting the body of the instrument symmetrical. I built a rig and tried to slowly bend it into place, but in the end, the instrument stayed a few centimeters off of center. Not the end of the world, but a little frustrating.
- Cutting the excess wood off of the side of the soundboard. I really should have practiced on something before letting loose. There are some little gouges on the top from the router, but they aren't all that noticeable.
- "Machining" the block of brass into a handle crank. Brass is soft, but it is still terrifying to tear into with a jig saw, and as much as I sanded and buffed, I could never quite get it straight and even. I think one of the holes will eventually fail because I drilled it slightly off. So I look forward to doing this again...ha ha ha.
- Installing and truing the wheel. This was a bitch, only because I was working in a tight spot (the wheel hole), and the axle that the wheel is on is threaded all the way down, so the wheel would move around if I didn't secure it just right. I did have to pull the whole thing out once and just do it all over again. I also had to widen the provided bushings to allow the wheel to turn freely, which I would have thought to be unnecessary. Truing the wheel was hard, and I was ultimately unsuccessful. There is a little "wow" in the sound, but nothing too awful.
- Getting the first sounds out of the instrument. This was discouraging after all the work I did, but after experimenting with rosin and cotton, I got some good tone. My only complaint is that the instrument is a little quiet. I wish it projected more...I don't have any sound holes, but the manual said they weren't necessary for sound production. I'm not so sure now...
- Cutting the grooves in the melody bridge. I'm still working on that.
Exhaustive? Exhausting? Yes, a bit of both. But I do enjoy playing this thing, and my friends and wife find it very intriguing...how many folks have a hurdy gurdy sitting on their china hutch?